4 Ways: How to Protect Files from Being Deleted in Windows 11/10
Method 1: Protect Files Using IUWEsoft Password Protect Folder Pro
The easiest way to protect your files and folders from being deleted, copied or accessed by others is IUWEsoft Password Protect Folder Pro. This software allows people to modify, edit or delete your files without their permission. It enables you to hide, lock, disguise or protect private files on local and external disks. You just need to do the following three steps to protect files from being deleted.
Step 1: Download, install and launch IUWEsoft Password Protect Folder Pro on your computer, enter a valid email address and registration code to register.

Step 2: Click "Lock File/Folder" or "Protect USB" to encrypt files, folders or drives.

Step 3: Select the file or driver, select lock type, input and confirm your password and click "Lock" button.


Method 2: Configure permission settings to protect files
Windows users can configure permission settings to grant or deny other users access to files. This way, you can only allow trusted people to access your files and protect them from deletion.
Step 1: Right-click on the file you want to protect and select the "Properties" option.
Step 2: Select the Security tab and click the Edit button to change permissions.

Step 3: In the pop-up permissions window, select the Add button.
Step 4: A new window called "Select User or Group" will pop up on your screen. Here, type "Everyone" in "Enter object names into the selected box" and press "OK".

Step 5: In the same window, select the "Everyone" username. Next, go to the "Permissions for everyone" section and tick the box next to the "Full Control" option.
Step 6: Click Apply > OK and your files will now be protected.

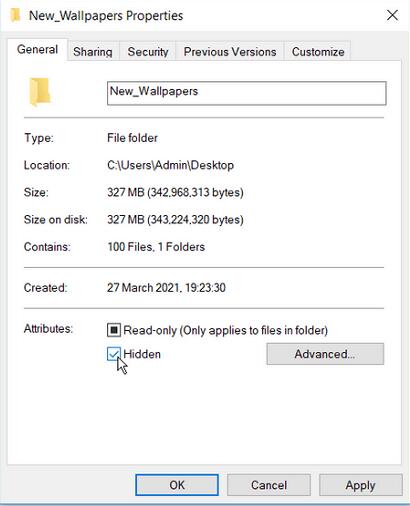
Method 3: Hide files in Windows 11/10
Windows also allows its users to protect their files from deletion with simple hidden options. You can hide your files on your PC by following three steps:
Step 1: Right-click the file you want to prevent from being deleted.
Step 2: Select Properties and go to the General tab.
Step 3: Check the hidden box and press Apply > OK.
To view hidden files, go to Windows File Explorer > View tab > uncheck the Hidden items box.

Method 4: Protect files from deletion using Command Prompt
Step 1: Press Windows + R keys and type CMD in the command box.
Step 2:Press Ctrl + Shift + Enter to launch an elevated command prompt.
Step 3:Lock your files or folders with this command prompt.
cacls File_or_Folder_Path /P Work: n
You need to replace the File_or_Folder_Path command with your file or folder path, for example:
Go to the file you want to prevent from being deleted.
Go to properties and press the security tab.
Copy the file path and paste it into the relevant part of the command.
The command looks like this:
cacls C:\Users\Admin\Desktop\New_Wallpapers /P Work: n
