3 Ways: How to Remove/Delete/Disable Write-Protection on Windows
When you want to delete files, you may not be able to perform the process. The reason Windows prompts you that you cannot delete the target file is that it is write-protected. This means that you must disable write protection before attempting to delete the file. If you can't edit or save files on a USB drive, SD card, or hard drive, your device may be locked in read-only mode. This article explains how to remove write protection from an USB drive, SD card or hard drive. It works on Windows 10, Windows 8 and Windows 7.
Method 1: Remove/Delete/Disable Write Protection with Properties
If the file to be deleted is stored on the local disk, you can view the file status in the properties and turn off read-only protection.
Step 1: Open File Explorer and find the file you want to delete.
Step 2: Right-click on the target file and select Properties.
Step 3: Under the General tab, there is a "Properties" option. If the read-only option is selected, this may be why you failed to delete this file.
Step 4: Uncheck the read-only option, click OK to save the changes. Then try again and see if you can now delete the file.

Method 2: Remove/Delete/Disable Write Protection Using Command Prompt
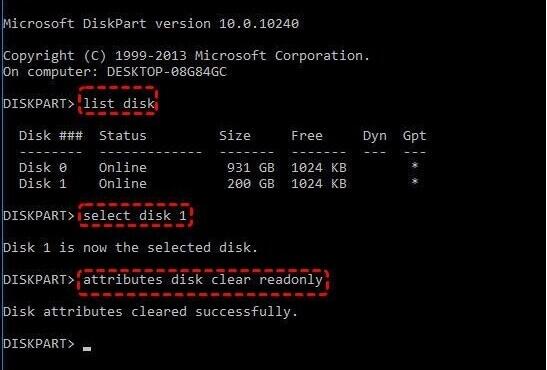
Another reason to write-protect a file is that the entire disk is actually write-protected. To disable disk write protection, you can use the Windows Command Prompt.
Step 1: Press Windows + R keys simultaneously to open the run box. Then type cmd to open the command prompt.
Step 2: Type the following command lines one by one. Press Enter after each command.
Diskpart
List disk
Select disk X (X is the number of your write-protected disk)
Attributes Disk clear Readonly
Step 3: Once the process is complete, close the Command Prompt window and try deleting the file again.
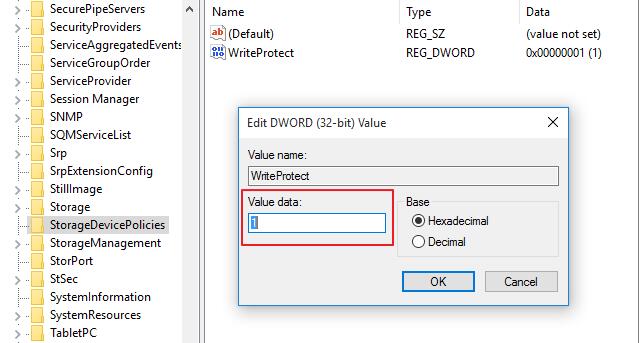
Method 3: Remove USB/Pen Drive and SD Card Write Protection with Regedit
When your USB flash drive, Pen drive or SD Card is write-protected, you cannot move or delete files on it. To fix this, you need to disable the USB/Pen Drive or SD Card write protection first. You can simply check for a write-protect lock on the side of the USB/Pen Drive or SD Card. If so, turn off the lock switch and see if you can now manage files on the USB/Pen Drive or SD Card. If your USB/Pen Drive or SD Card does not have a protection lock, then you can disable write protection by following the steps below.
Step 1: Press Windows + R keys at the same time to bring out the Run box. Enter regedit and click OK.
Step 2: Navigate to the following folder:
Computer\HKEY_LOCAL_MACHINE\SYSTEM\CurrentControlSet\Control\StorageDevicePolicies
If the StorageDevicePolicies folder is missing on your computer, you can create one with yourself. Right-click on the Control folder, Go to New > Key. This step will create a new subfolder under Control. Name it "StorageDevicePolicies".
Step 3: Then right-click the StorageDevicePolicies folder, choose DWORD (32-bit) value, go to WriteProtect, and change the Value data from 1 to 0.
If the StorageDevicePolicies folder is newly created, then you need also to create the WriteProtect yourself. Right-click StorageDevicePolicies, go to New and hit DWORD (32-bit) Value. Name the new entry "WriteProtect" without quotes.
Step 4: Click OK to close the Registry Editor. Restart your computer and see if you can delete the files stored on USB/Pen Drive or SD Card.